Cockpit – Simulador de Impacto Tributário

Simulador de Impacto Tributário
Por Fernanda Almeida
O Cockpit é um cliente de gestão de regras tributárias. Trata-se de uma ferramenta interativa que entre outras funcionalidades, visa facilitar a visualização das regras tributárias, permitindo aprová-las, rejeitá-las e exportá-las em formato *.csv. Fornece API´s para integrá-lo em soluções do cliente como ERP´s.
O Cockpit possui várias funcionalidades que podem ver conferidas através do manual no link: https://documentacao.systax.com.br/PublicView2/Index/a3f3ce1a4226cfd2307ea4d2c/25202
Dessa forma, de acordo com a necessidade do cliente, podemos implementar rotinas específicas que atendam ao seu fluxo operacional ou necessidade específica.
Recentemente implementamos o recurso: “Simulador de Impacto Tributário”.
O Simulador de Impacto Tributário foi desenvolvido no cockpit com o objetivo de demonstrar os cálculos dos tributos considerando as informações da regra vigente e da regra futura (oriunda de atualização de informações promovida pelo fisco Estadual ou Federal). As premissas utilizadas para parametrização do relatório são:
- Somente será possível o cálculo se houver uma regra com vigência atual e uma regra com vigência futura;
- As regras deverão estar com status de “Aprovadas”;
- Caso não exista uma regra com vigência futura ou que a regra esteja pendente de aprovação, também não é possível executar o cálculo.
A rotina para geração do relatório está disponível no cockpit:
- Mais Opções
- Exportar Regras

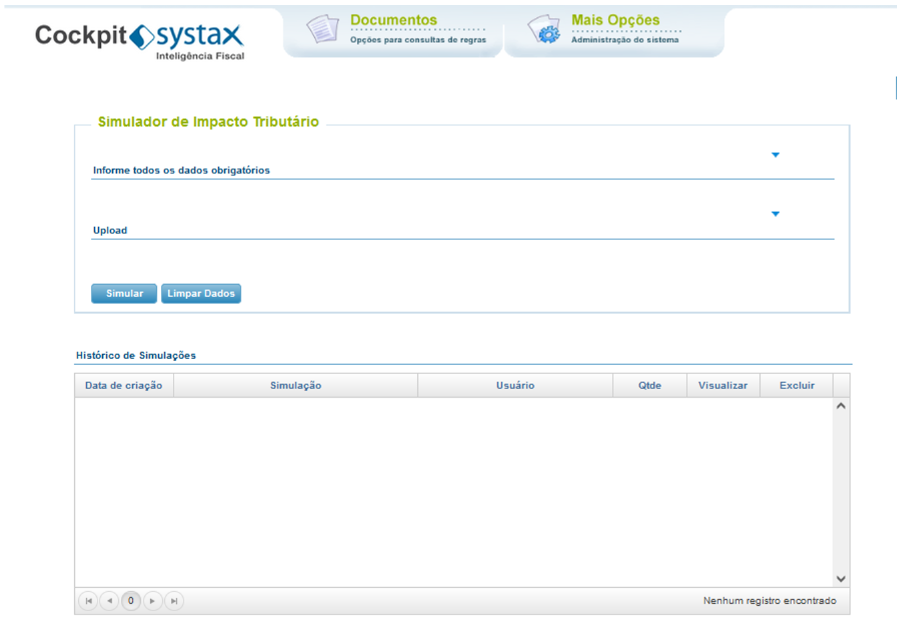
Ao clicar no recurso do Simulador, o usuário será direcionado para a tela principal:

Para expandir a tela de filtros, clicar na seta  :
:

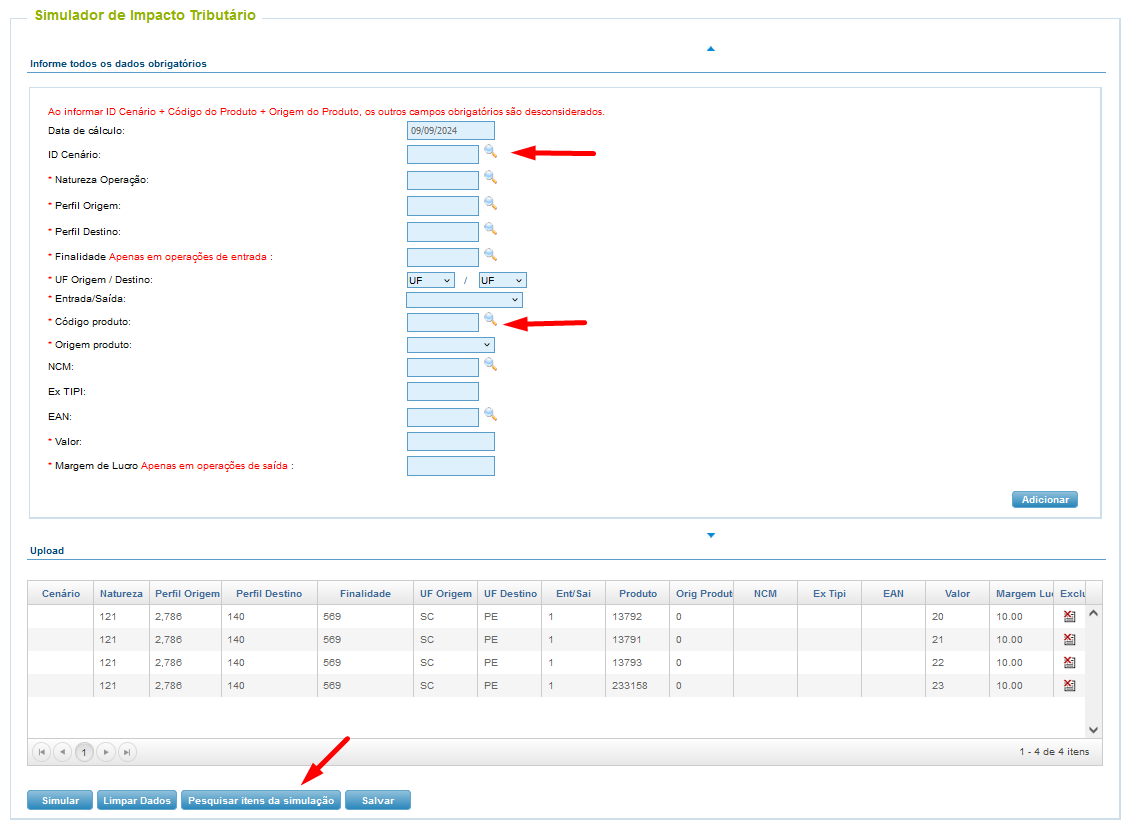
A primeira parte refere-se à inserção manual de informações para a simulação ou a pesquisa de cenários ou produtos simulados:
|
Data do Cálculo |
Data Corrente – O primeiro cálculo será executado sempre considerando a data do dia |
|
ID cenário |
Código do cenário desejado (essa informação consta tanto na rotina de consulta quanto na rotina de aprovação de regras |
|
Natureza de Operação |
Natureza de Operação desejada, por exemplo: 121 – venda/compra de mercadoria adquirido de terceiros 108 – transferência de mercadorias/bens para comercialização |
|
Perfil Origem |
Perfil de Origem desejado, por exemplo: 1 – indústria 2 – atacadista 3 - varejista |
|
Perfil Destino |
Perfil de Destino desejado, por exemplo: 3 – Consumidor Final Contribuinte 6 – Consumidor Final Não contribuinte 138 – Atacadista 140 - Varejista |
|
Finalidade |
Finalidade desejada, por exemplo: 569 – Compra para Comercialização 175 – Transferência para comercialização 43 – Compra para consumo (Essa informação é necessária somente para a simulação de cenários de Entrada) |
|
UF Origem/Destino |
Seleção da UF de Origem e Destino |
|
Entrada/Saída |
Tipo de Entrada ou Saída: 1 – Entrada 3 - Saída |
|
Código Produto |
Código do produto |
|
Origem Produto |
Origem do produto disponível |
|
NCM |
Classificação Fiscal do Produto |
|
Ex TIPI |
Ex-tarifário do produto |
|
EAN |
EAN do produto |
|
Valor |
Valor do produto |
|
Margem de Lucro |
Percentual de margem de lucro (Essa informação é necessária somente para a simulação de operações de Saída) |
Importante: Ao incluir o ID cenário, os campos de “natureza de operação”, “perfil origem”, “perfil destino” e “finalidade” serão desconsiderados.
Caso alguma informação obrigatória não seja informada, o cockpit abrirá uma tela de pop-up informando o campo faltante.
Para incluir um novo registro para simulação, clicar no botão  .
.
O registro será listado na parte “Upload”, onde o usuário poderá verificar todos os registros inseridos para simulação:

A segunda parte da tela refere-se a rotina de Upload, onde o usuário poderá fazer a inserção das informações por meio de uma planilha de CSV:
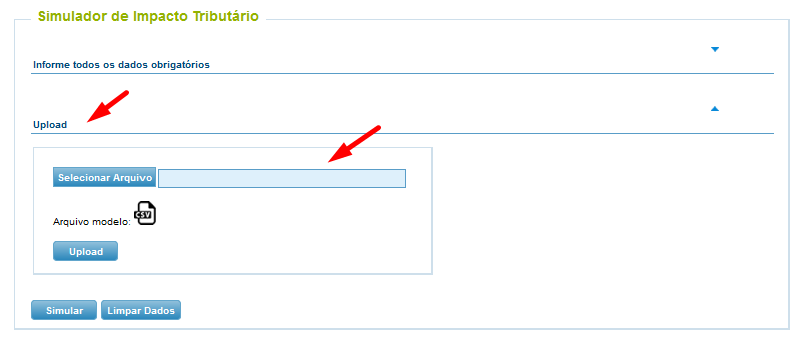
O cockpit fornece o arquivo modelo para o usuário preencher as informações, basta clicar no ícone  :
:

Após preencher o CSV com todas as informações relativas ao cenário e produto, basta selecionar o arquivo em seu computador e clicar no botão  .
.
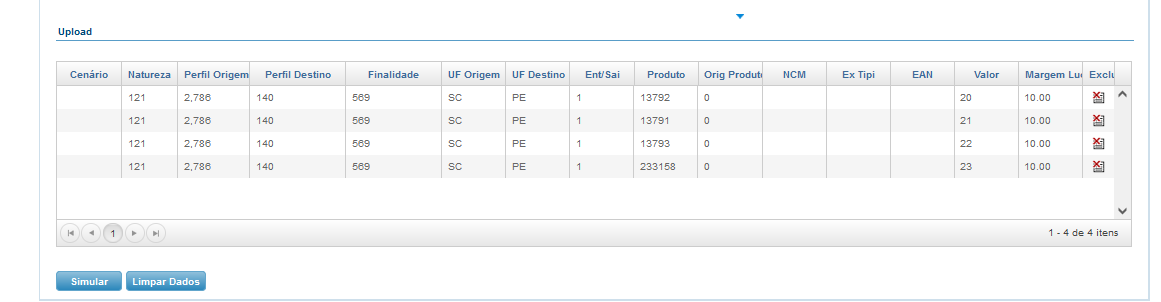
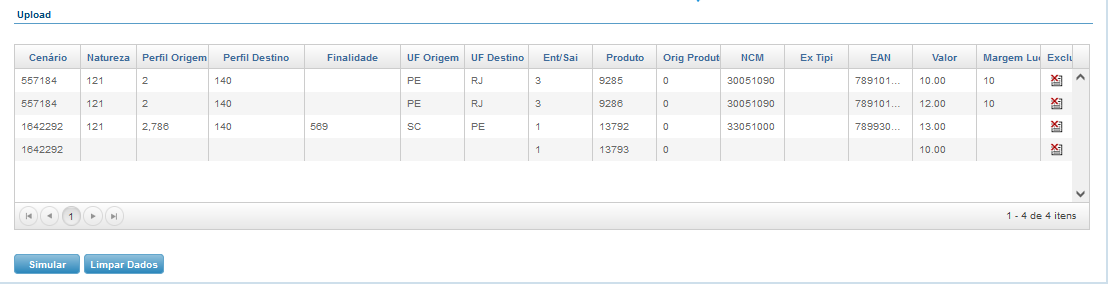
Todos os registros serão listados na parte “Upload”, onde o usuário poderá verificar todos os registros inseridos no CSV para simulação:
Após a inserção das informações, seja manualmente pelos filtros ou pelo upload do CSV, basta clicar em  .
.
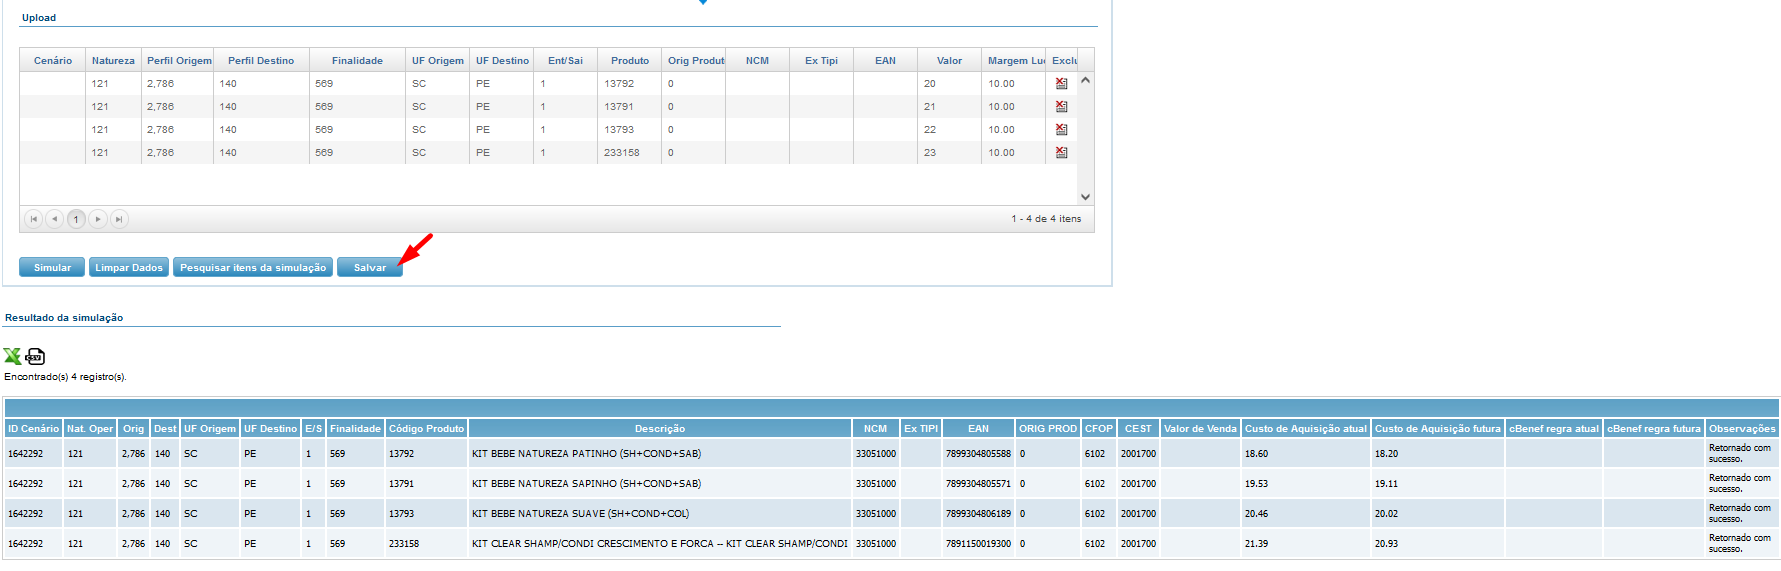
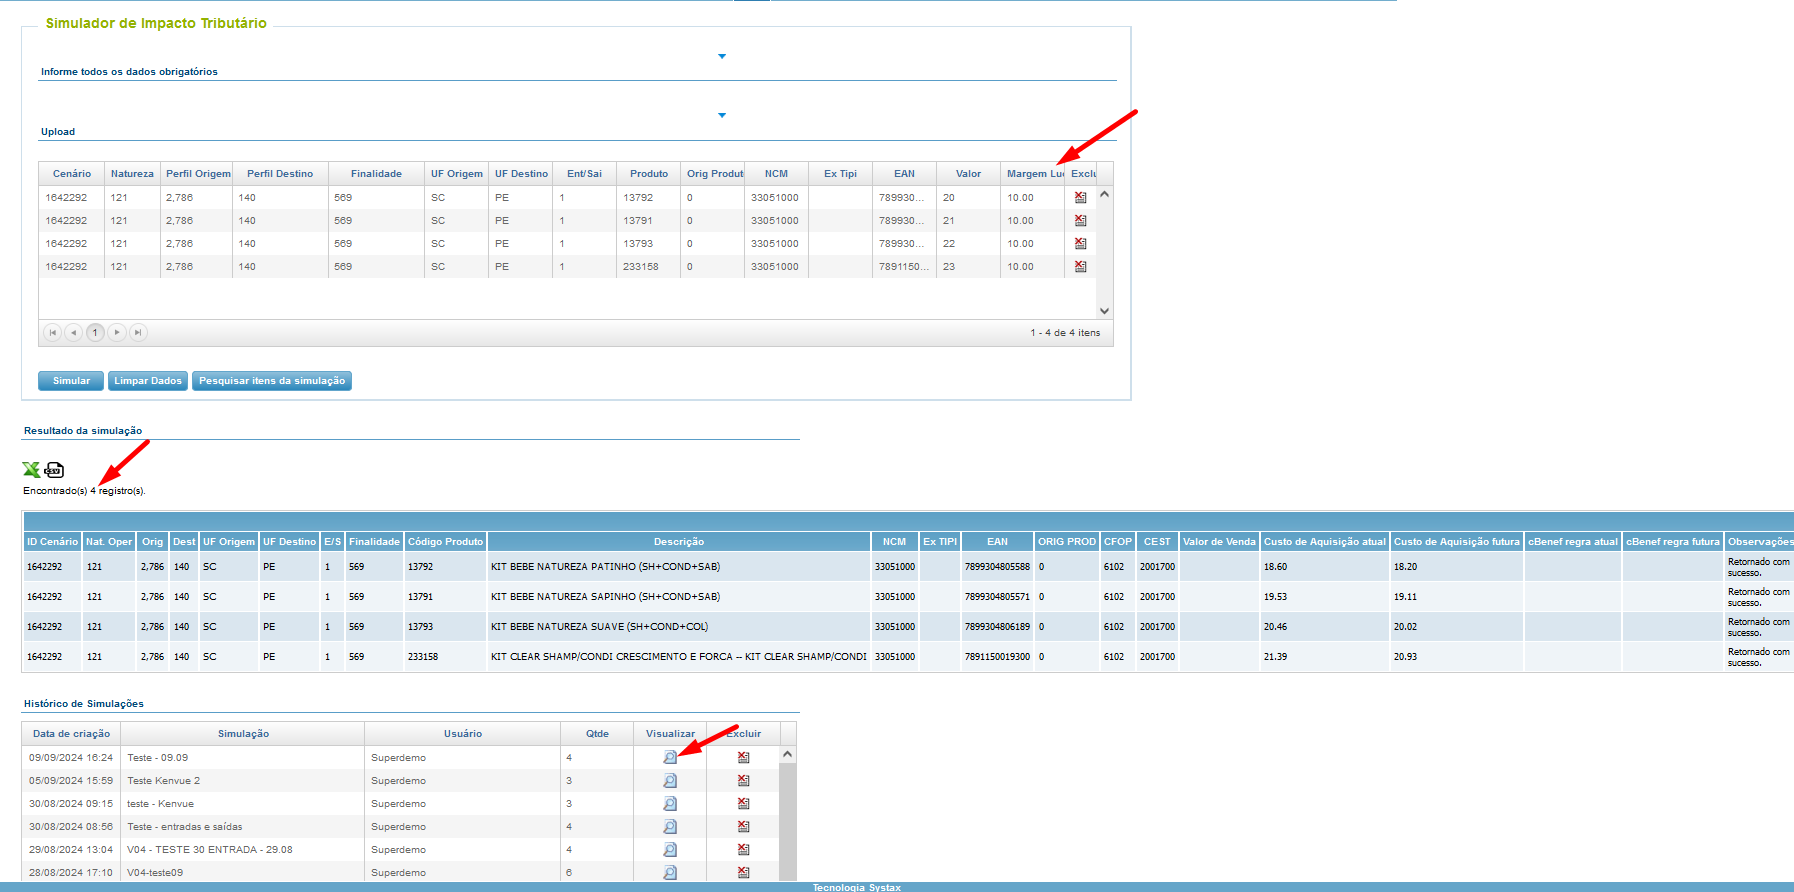
O cockpit acionará o motor de cálculo e retornará o resultado das simulações:


Caso o usuário queira visualizar somente alguns itens da simulação, poderá utilizar a tela de filtros e clicar no botão  :
:
Caso queira limpar os dados, ou seja, apagar todas as informações em tela, clicar no botão .
.
Após a simulação concluída, o usuário pode fazer a exportação dos dados em tela para o Excel, basta clicar no ícone  :
:

Caso o usuário queira exportar os dados em formato CSV, basta clicar no ícone  :
:

O arquivo será disponibilizado dessa forma:


Caso o usuário, esteja trabalhando em uma simulação e queria avaliar os resultados, poderá salvar a simulação em tela e recuperá-la em momento posterior.
Para fazer essa ação, o usuário deverá estar com a simulação em tela e clicar no botão  :
:

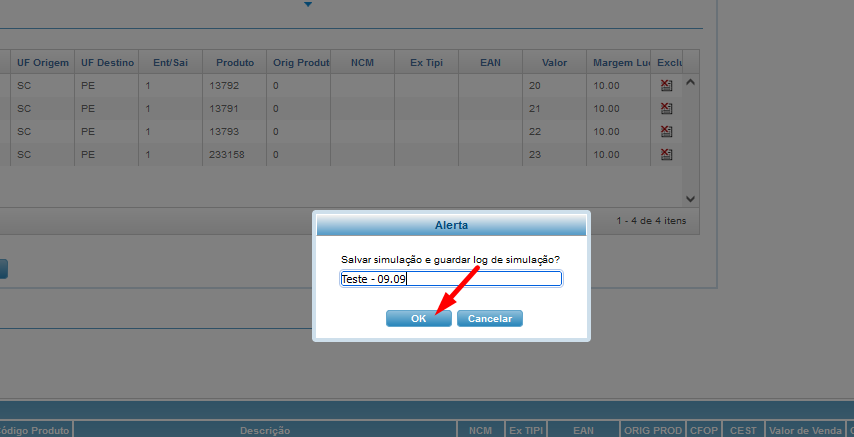
Ao clicar no botão, abrirá uma tela de pop-up para o usuário informar o nome do arquivo:
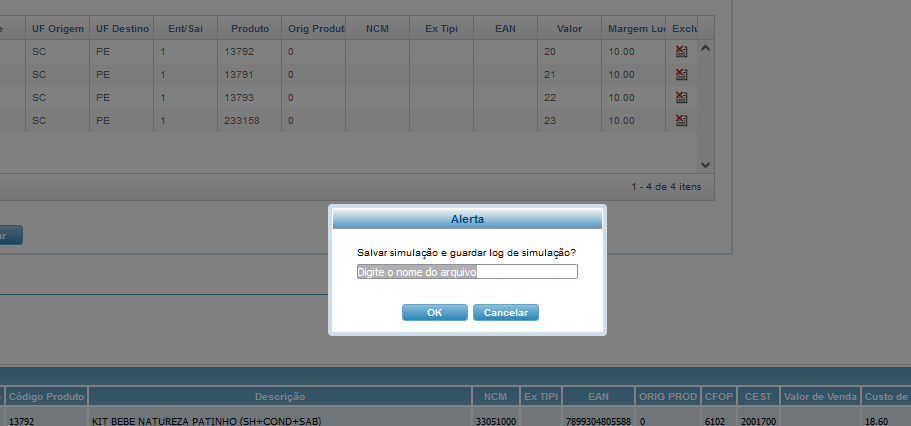
Informar o nome do arquivo e clicar em  :
:

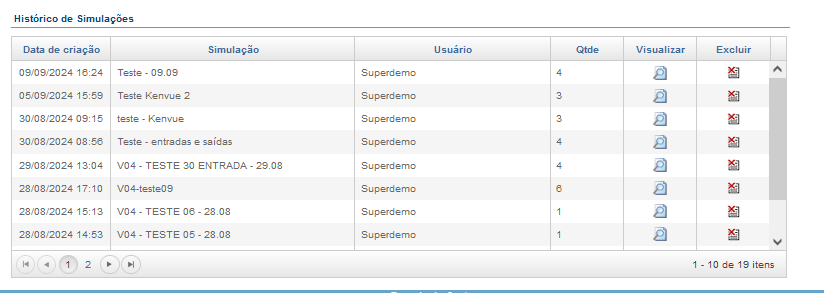
O usuário visualizará na parte “Históricos de Simulações” a simulação salva:
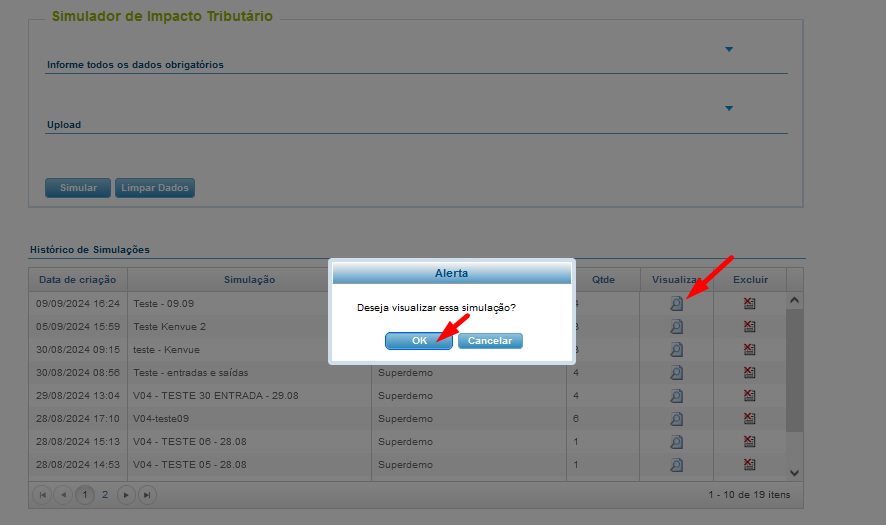
Ao clicar no ícone  poderá recuperar a simulação executada e salva anteriormente. As informações ficarão disponíveis em tela:

Para dar ao usuário uma visão mais sintética da simulação, será disponibilizado o dashboard das informações simuladas.
Para gerar o dashboard, basta clicar no botão  :
:

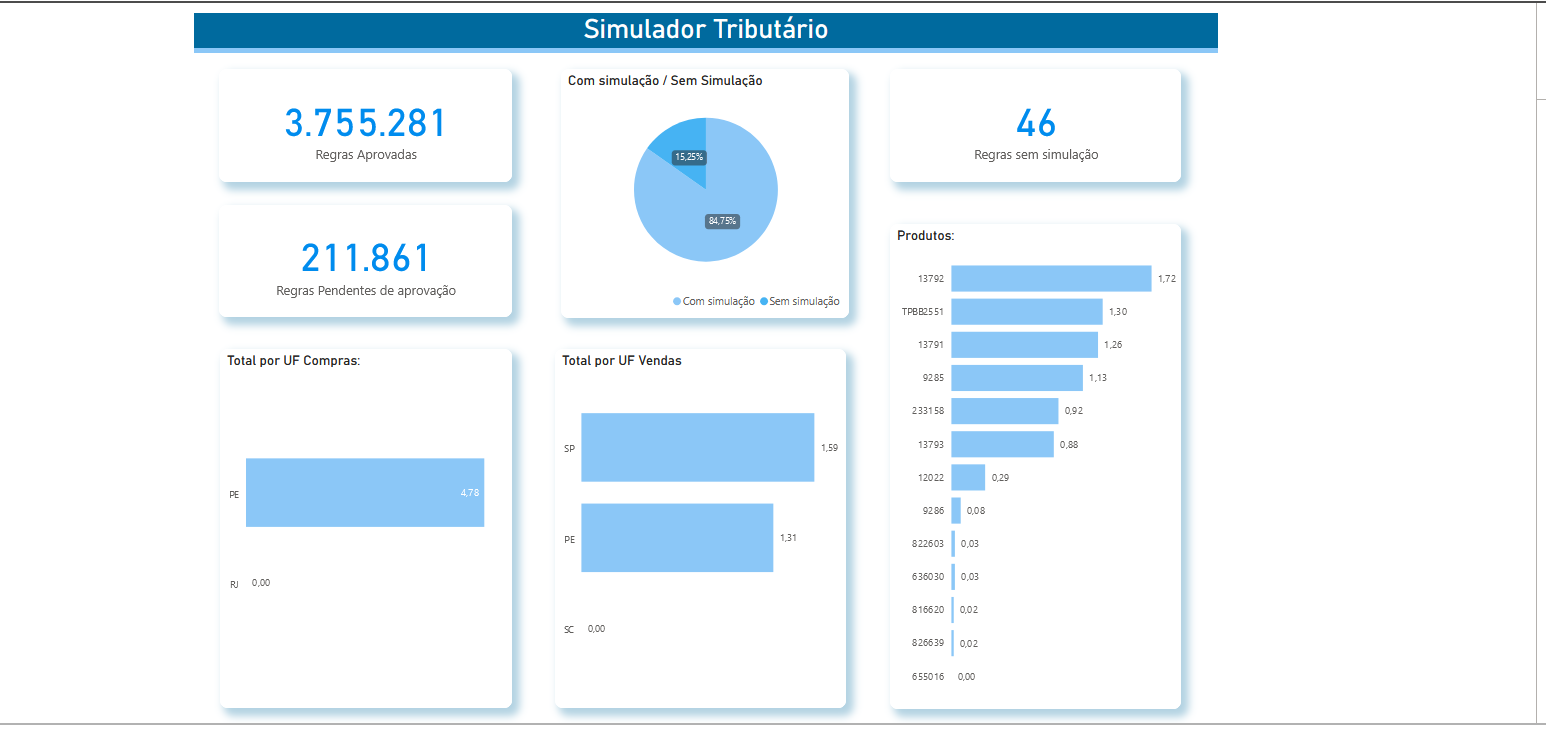
Ao clicar no dashboard, abrirá automaticamente uma tela de pop-up onde demonstrará os seguintes indicadores:
- Total de Regras Aprovadas;
- Total de Regras sem Aprovação;
- Com Simulação / Sem Simulação apresentação no Gráfico em formato pizza demonstrando o percentual de solicitações com e sem simulação;
- Total de Regras sem Simulação;
- Total por UF – Compras informando a soma de diferenças no comparativo e informando do maior valor somado para o menor;
- Total por UF – Vendas informando a soma de diferenças no comparativo e informando do maior valor somado para o menor;
- Produtos informando os produtos que tiveram impacto de alteração, considerando a soma de valor no comparativo (considerando em quantos cenários houve a alteração) e informando do maior valor para o menor
As informações são geradas automaticamente partindo das simulações realizadas na tela do Simulador de Impacto Tributário.
A apresentação do dashboard é dessa forma:
Conclusão:
Esse recurso foi criado para possibilitar o usuário comparar os cálculos tributários quando há uma alteração de legislação, dando assim visibilidade do impacto tributário que a empresa sofreu com aquela alteração.
O Simulador de Impacto Tributário é um recurso adicional e para se ser habilitado, deve ser verificado com a equipe Comercial.
Tax Impact Simulator
By Fernanda Almeida
Cockpit is a tax rule management client. It is an interactive tool that, among other features, aims to facilitate the visualization of tax rules, allowing users to approve, reject, and export them in *.csv format. Provides APIs to integrate it into client solutions such as ERPs.
The Cockpit has several features that can be checked through the manual at the following url: https://documentacao.systax.com.br/PublicView2/Index/a3f3ce1a4226cfd2307ea4d2c/25202
In this way, according to the client's needs, we can implement specific routines that meet their operational flow or specific requirements.
We recently implemented the feature: "Tax Impact Simulator."
The Tax Impact Simulator was developed in the cockpit with the aim of demonstrating the calculations of taxes considering the information from the current rule and the future rule (originating from updates provided by the State or Federal tax authorities). The premises used for the parameterization of the report are:
- The calculation will only be possible if there is a rule with current validity and a rule with future validity;
- The rules must have a status of "Approved";
- If there is no rule with future validity or if the rule is pending approval, it is also not possible to perform the calculation.
The routine for generating the report is available in the cockpit.
- More Options
- Export Rules
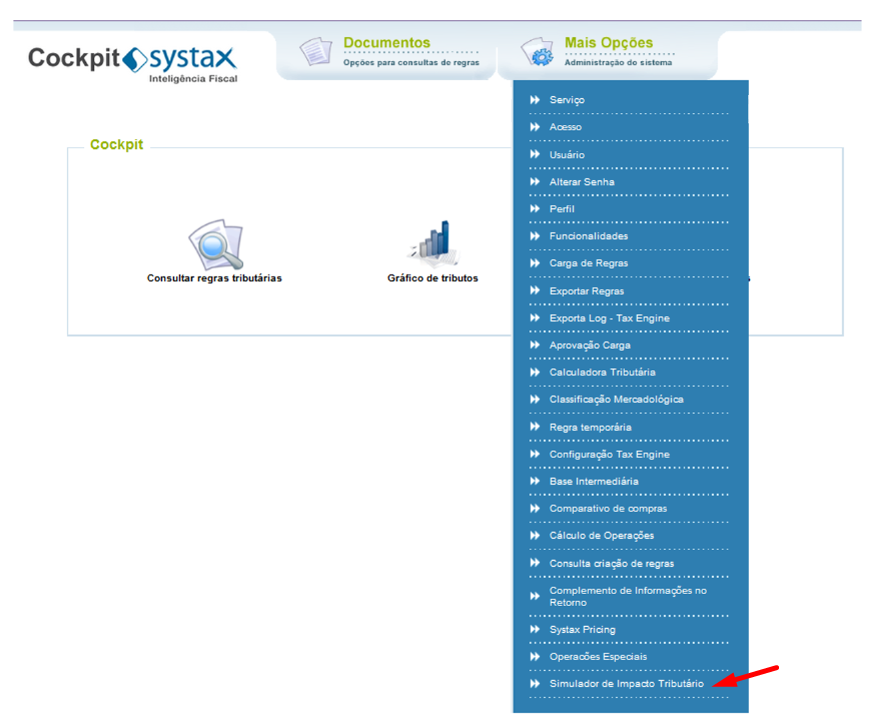
By clicking on the Simulator feature, the user will be directed to the main screen:
To expand the filter screen, click on the arrow :
:
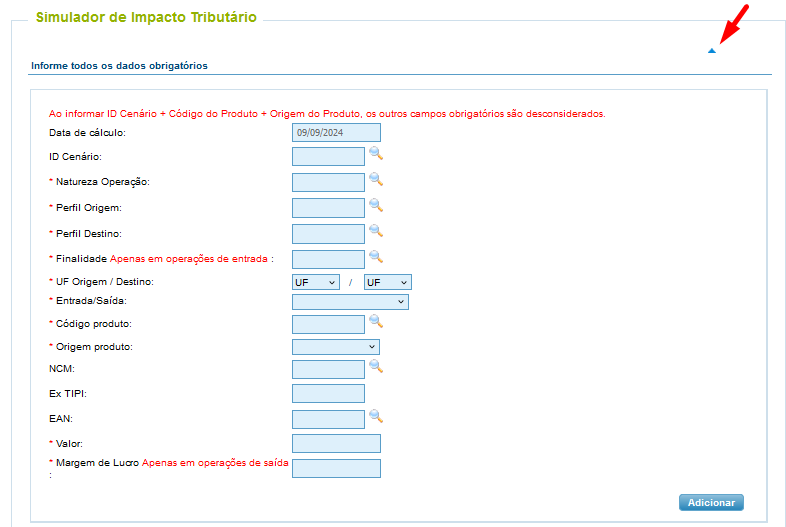
The first part refers to the manual input of information for simulation or the research of simulated scenarios or products:
|
Calculation Date |
Current Data – The first calculation will always be executed considering the day it is being performed. |
|
ID scenario |
ID code of the desired scenario (this information is present in both the query routine and the rule approval routine) |
|
Nature of Operation |
Desired Nature of Operation, for example: 120 – sale/purchase of own production 121 – sale/purchase of goods acquired from third parties 108 – transfer of goods/assets for commercialization |
|
Origin Profile |
Desired Origin Profile, for example: 1 – industry 2 - wholesaler 3 - retailer |
|
Destination Profile |
Desired Destination Profile, for example: 3 – Final Consumer Taxpayer 6 – Final Consumer Not Subject to Tax 138 – Wholesaler 140 - Retailer |
|
Purpose |
Desired purpose, for example: 569 – Purchase for Commercialization 175 – Transfer for commercialization 43 – Purchase for consumption (This information is only necessary for the simulation of Entry scenarios) |
|
State of Origin/Destination |
Selection of the State of Origin and Destination |
|
Input/Output |
Type of Input or Output: 1 – Entrance 3 - Exit |
|
Product Code |
ID code attributed to the product |
|
Product Origin |
Origin of the available product |
|
NCM |
Tax Classification of the product |
|
Ex TIPI |
Ex-tariff for the product |
|
EAN |
EAN of the product |
|
Value |
Value of the product |
|
Profit Margin |
Profit margin percentage (This information is only necessary for the simulation of Exit operations) |
Important: When including the scenario ID, the fields for "nature of operation," "origin profile," "destination profile," and "purpose" will be disregarded.
If any mandatory information is not provided, the cockpit will display a pop-up screen indicating the missing field.
To include a new record for simulation, click the button  .
.
The record will be listed in the "Upload" section, where the user can check all the records entered for simulation.
The second part of the screen refers to the Upload routine, where the user can input information through a CSV spreadsheet:

The cockpit provides the template file for the user to fill in the information; just click on the icon  :
:

After filling in the CSV with all the information related to the scenario and product, just select the file on your computer and click the button  .
.
All records will be listed in the "Upload" section, where the user can check all the records entered in the CSV for simulation:

After entering the information, either manually through the filters or by uploading the CSV, just click on  .
.
The cockpit will activate the calculation engine and return the results of the simulations:


If the user wants to view only certain items from the simulation, they can use the filter screen and click the button  :
:

If you want to clear the data, that is, erase all the information on the screen, click the button  .
.
After the simulation is completed, the user can export the on-screen data to Excel by simply clicking on the icon  :
:

If the user wants to export the data in CSV format, just click on the icon  :
:

The file will be made available in this way:


If the user is working on a simulation and wants to evaluate the results, they can save the simulation on screen and retrieve it at a later time.
To perform this action, the user must have the simulation on screen and click the button  :
:
By clicking the button, a pop-up screen will open for the user to enter the file name:

Inform the file name and click on  :
:
The user will see the saved simulation in the "Simulation History" section:

By clicking on the icon  You will be able to recover the simulation that was executed and saved earlier. The information will be displayed on the screen:

To provide the user with a more concise view of the simulation, the dashboard of the simulated information will be made available.
To generate the dashboard, just click the button  :
:

When clicking on the dashboard, a pop-up screen will automatically open displaying the following indicators:
- Total of Approved Rules;
- Total number of rules without approval;
- With Simulation / Without Simulation presentation in a pie chart format demonstrating the percentage of requests with and without simulation;
- Total Rules without Simulation;
- Total by State – Purchases indicating the sum of differences in comparison and reporting from the highest summed value to the lowest;
- Products indicating the items that had an impact due to changes, considering the total value in comparison (taking into account how many scenarios there were changes) and reporting from the highest value to the lowest.
The information is automatically generated based on the simulations carried out on the Tax Impact Simulator screen.
The presentation of the dashboard is as follows:

Conclusion:
This resource was created to allow the user to compare tax calculations when there is a change in legislation, thus providing visibility into the tax impact that the company has experienced due to that change.
The Tax Impact Simulator is an additional resource, and to be enabled, it must be verified with the Commercial team.